Xamarin.iOS Storyboard Rendering Problem with NullReferenceException

Problems

Recently when trying to open iOS UI Designer to edit storyboard/xib file, I have encounter some problems. This issue is also reported in Xamarin BugZilla: https://bugzilla.xamarin.com/show_bug.cgi?id=59623

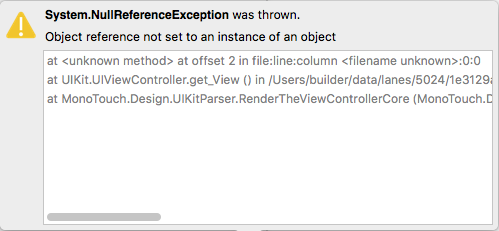
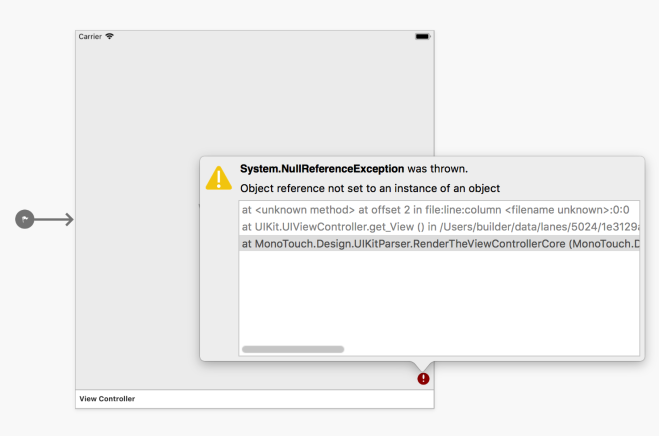
Problem 1: ViewControler is rendered but with error exclamation mark

There are many different errors but this is the most common error: System.NullReferenceException

Screen Shot 2017-11-04 at 9.33.17 AM.png

Problem 2: UI Designer took very long time to load and not able to render custom view

After UI Designer is startup, it will show a warning bar at the top. In this mode, all custom view is not rendered.

Screen Shot 2017-11-04 at 9.32.05 AM.png

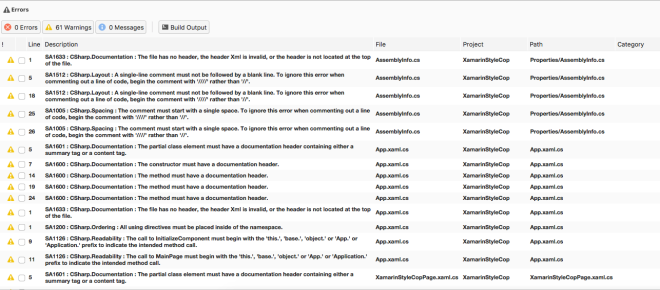
Checking in the log files and you might get the following errors:

System.NullReferenceException: Object reference not set to an instance of an object
  at MonoTouch.Design.Client.IPhoneDesignerSession+<MaybeConvertToLatestXcode>c__async5.MoveNext () [0x0004c] in /Users/builder/data/lanes/4470/6c2f6737/source/md-addins/Xamarin.Designer.iOS/MonoTouch.Design.Client/IPhoneDesignerSession.cs:774

Reasons & Solutions

After checking into the log file, found out that the UI Designer actually call into UIViewController‘s (those that defined in the storyboard/xib) ViewDidLoad method. In the ViewDidLoad method, I have some code that is dependency injection which is not available during design time. This is the reason why there is NullReferenceException when render.

Attempt 1: Do not run code in ViewDidLoad during design time

I have defined a boolean IsDesignTime in AppDelegate.cs. By default it is set to true and it will set to false when called into FinishedLaunching method in AppDelegate. Then in ViewDidLoad method, I will check only when IsDesignTime is false, I will run the code.

// AppDelegate.cs 
public class AppDelegate : UIApplicationDelegate
 {
     public static bool IsDesignTime = false;
 
     public override bool FinishedLaunching(UIApplication application, NSDictionary launchOptions)
     {
         IsDesignTime = false;
         return true;
     }
...
}
// ViewController.cs 
public partial class ViewController : UIViewController
 {
     public override void ViewDidLoad()
     {
         base.ViewDidLoad();
 
         if (!AppDelegate.IsDesignTime)
         {
             // Do something
         }
     }
...
}

This method can solve the problem and the view is able to render correctly in UI Designer again. However, it is kind of troublesome to add this checking every time. In addition, this method seems not working for views that inherit from UITableViewController

Attempt 2: Set the ViewController DesignTimeVisible flag to false

Checking in the UI Designer, you will find that under the Toolbox, the ViewController is also showing as a custom component.

Screen Shot 2017-11-04 at 10.09.25 AM

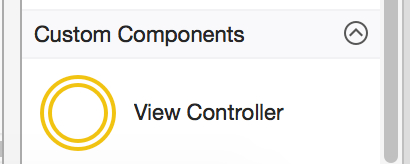
This is the reason why the ViewController‘s ViewDidLoad method is getting call during design time.

To remove the screen from being use as a custom components, we will need manually add an DesignTimeVisible attribute for the ViewController class and set the flag to false.

[System.ComponentModel.DesignTimeVisible(false)]
public partial class ViewController : UIViewController


After that, clean and rebuild the solutions. The screen should not showing in the Toolbox‘s Custom Components section now. Also, it will no longer call into ViewDidLoad method during design time. Adding the attribute to all the screens that defined in storyboard/xib solve the issue for now.


Run Xamarin Android App In Pre-Lollipop Device

Recently when I try to deploy app in pre-lollipop devices (KitKat, Jelly Bean, …), I encounter a problem that the app will stop immediately after it is launch.

To simulate the problem, here is the steps:

  1. Create a New Project in Visual Studio 2015. Cross-Platform->Cross Platform App (Xamarin)
    2017-09-26 22_30_50-New Project.png
  2. Create a new blank Xamarin Forms app. (Native app will also have the same problem)
    2017-09-26 22_31_33-New Cross Platform App - App29.png
  3. Build solution and deploy the app to pre-lollipop device. In my case, I’m deploying to 4.1.2 emulator (Jelly Bean API 16).
    2017-09-26 22_32_39-App29 - Microsoft Visual Studio.png
  4. After the app is launch, immediately the app will close and exit from debug mode.
  5. The problem is not showing any hint in the output or device log.
    2017-09-26 22_38_10-App29.png
  6. Without writing any code, we already not able to deploy the app to pre-lollipop device.

Solution

The reason of the problem is due to the app is using Mono Shared RunTime. To solve the issue, we will need to turn off this feature in Visual Studio.

  1. Go to Android project properties->Android Options, uncheck “Use Shared RunTime”
    2017-09-27 00_06_40-App29 (Running) - Microsoft Visual Studio.png
  2. There is another bug in Xamarin that after we turn on/off “Use Shared RunTime”, Supported Architecture settings will be updated. To change back the settings, click Advanced button in the same screen.
    2017-09-27 00_06_54-App29 (Running) - Microsoft Visual Studio.png
  3. Advanced Android Options dialog will be show and you will notice that the Supported architectures is updated.
    2017-09-27 00_05_11-Advanced Android Options.png
  4. Change back the Supported architectures to select all in Debug mode.
    2017-09-27 00_06_05-App29 (Running) - Microsoft Visual Studio.png
  5. The app should now able to deploy and run in pre-lollipop device.
    2017-09-27 07_27_29-Android Emulator - Nexus4_412_5554.png

Xamarin + StyleCop in Visual Studio for Mac

StyleCop analyses C# source code to enforce a set of style and consistency rules. It is available in two primary forms:

  • The StyleCop Visual Studio extension, which allows StyleCop analysis to be run on any file, project, or solution in Visual Studio without modifying the source code. Visual Studio 2010, 2012, 2013, 2015, and 2017 are supported by this extension.
  • The StyleCop.MSBuild NuGet package, which allows StyleCop analysis to be added to any .NET 4.0+ project without installing anything else on the system.

This article will be focusing on how to add StyleCop.MSBuild into Xamarin project.

Note: The Roslyn-based StyleCopAnalyzers project is recommended for developers who use only Visual Studio 2015 or later. However, Roslyn-based packages is not supported in Visual Studio for Mac. Let’s wait for Xamarin team to support that in future.

The source code that is use for the following guide can be found HERE.

Setup

Current latest version of StyleCop.MSBuild is 5.0.0 which support C# 6 syntax. Add the package with NuGet package manager to the projects.

Install-Package StyleCop.MSBuild -Version 5.0.0

Screen Shot 2017-08-26 at 8.01.24 AM.png

After added the package, your project is now ready with StyleCop. We can test it out by start building the project. After build complete, you should see some warnings show in Errors Pad trigger by StyleCop.

Screen Shot 2017-08-26 at 8.04.23 AM.png

Modify StyleCop Settings

By default, if we did not supply with any settings file, StyleCop will analyse using its own default settings. The default settings file is located in

 packages\StyleCop.MSBuild.{version}\tools\Settings.StyleCop

To edit the Settings file, we can manually open it in text editor and add in our rules. However, this will be too troublesome to remember the syntax and format of the StyleCop settings. Luckily, StyleCop ship together with a Settings Editor application. It is located in:

packages\StyleCop.MSBuild.{version}\tools\StyleCop.SettingsEditor.exe

Unfortunately, we cannot open this editor in Mac, not even with the help of mono. So, we will need to open it in Windows environment. Copy the files to Windows and execute the editor using command prompt with the following command:

StyleCop.SettingsEditor.exe [path-to-stylecop-settings-file]

After that, you can edit the settings in the GUI editor and click OK to save the file after you have done.

stylecop_settings_editor.png

Copy the Settings.StyleCop file back to your project root folder in Mac. Putting the settings file in the root of solutions folder will make the settings inherited by all projects. This file can then kept in Source Control and can be share to all developers in your project.

Cache

After you build the project and performed code analysis, StyleCop will create a cache file in each of the project folder (StyleCop.Cache). The next time StyleCop is run on the same project or file, the tool will determine whether any changes have occurred within the file since the last analysis. If not, the previous results are read from the cache. For larger files and projects, this can improve the overall performance of StyleCop.

Sometimes, you might prefer not storing the cache and run the analysis every time. In this case, you can go to StyleCop settings editor to turn the Cache off.

2017-08-26 23_15_47-StyleCop 5.0 (5.0.6329.1) Project Settings - C__SVN_fbp_trunk_src_StyleCop_Setti.png

Suppress Warnings

Sometimes we might want to suppress some warnings in some part of the code without turn off the rules. The following is example on how to suppress StyleCop warnings:

// Naming rules
[SuppressMessage("StyleCop.CSharp.NamingRules""SA1307:AccessibleFieldsMustBeginWithUpperCaseLetter", Justification = "Reviewed")]

// Documentation rules
[SuppressMessage("StyleCop.CSharp.DocumentationRules""SA1601:PartialElementsMustBeDocumented", Justification = "Reviewed")]


Xamarin installation in Mac

Setup Xcode

Xcode is needed for iOS development. It included with SDK to build iOS codes and iOS Simulators.

  1. Go to AppStore and search for Xcode. Click GET and INSTALL it. You will need to input your Apple ID and password in order to download app from AppStore.
    Screen Shot 2017-06-29 at 5.24.22 PM.png
  2. You will need to Agree on the License Agreement before Xcode start to download and install.Screen Shot 2017-06-29 at 6.10.53 PM.png
  3. Xcode will start to download (4GB++) now. The installation will start automatically after download completed. After that, click on Xcode button to start the app for once. During the first start, Xcode will initialize and install some components.
    Screen Shot 2017-06-29 at 6.11.16 PM.png
  4. After the initialization is completed, you should see the following screen. Xcode is successfully installed and you may close it now. Screen Shot 2017-06-29 at 6.12.15 PM.png

Setup Visual Studio for Mac

Xamarin development in Mac will be using Visual Studio for Mac.

  1. Download installer from visualstudio.comScreen Shot 2017-06-29 at 6.17.46 PM.png
  2. Double click on downloaded installer and you will see the following dialog popup. Double click on the Install button to start installation.
    Screen Shot 2017-06-29 at 9.07.51 PM.png
  3. Click Open button when there is a warning dialog popup.Screen Shot 2017-06-29 at 9.08.05 PM.png
  4. Visual Studio installer will now started and performing some checking on the machine.
    Screen Shot 2017-06-29 at 9.08.28 PM.png
  5. You will need to agree on the Microsoft Privacy Statement and License Terms in order to continue installation. Just click on Continue button.Screen Shot 2017-06-29 at 9.08.45 PM.png
  6. The installer will ask to get Xcode. We already completed this part and will just click on Continue button.
    Screen Shot 2017-06-29 at 9.09.03 PM.png
  7. Select all components that you would like to install. Then click on Install button.
    Screen Shot 2017-06-29 at 9.09.16 PM.png
  8. Components will start to download (~3.5GB). Screen Shot 2017-06-29 at 9.09.48 PM.png
  9. After half an hour, the installation is mark as successful. Click on Start Visual Studio button.Screen Shot 2017-06-29 at 9.32.37 PM.png
  10. Visual Studio for Mac is started and ready to build awesome app.Screen Shot 2017-06-29 at 9.33.30 PM.png

Setup Android SDK

  1. Click on Tools>SDK Manager
    Screen Shot 2017-06-29 at 10.13.09 PM - Copy.png
  2. A dialog is show but indicating Android SDK and Android NDK is not found. This might be due to we didn’t check to install Android SDK during Visual Studio for Mac installation.Screen Shot 2017-06-29 at 10.13.22 PM.png
  3. Run the Visual Studio for Mac installer again and Continue until Select components screen. Check to install Android SDK and click Install button.Screen Shot 2017-06-29 at 10.24.31 PM.png
  4. Android SDK started to install.Screen Shot 2017-06-29 at 10.25.08 PM.png
  5. After the installation completed, click on Tools>SDK Manager. SDK Manager dialog will popup.Screen Shot 2017-06-29 at 10.27.35 PM.png
    Screen Shot 2017-06-29 at 10.28.14 PM.png
    Screen Shot 2017-06-29 at 10.28.23 PM.png
  6. Update Android SDK according to recommended list in HERE

Installation Test: Xamarin iOS

  1. Open Visual Studio for Mac and click on New Project. New project dialog will popup. Select Xamarin.Forms>Blank Forms App and click Next button.Screen Shot 2017-06-29 at 10.29.03 PM.png
  2. Give the app a nameScreen Shot 2017-06-29 at 10.29.40 PM.png
  3. Specify Project Name, Solution Name and Location. Finally, click on Create buttonScreen Shot 2017-06-29 at 10.29.50 PM.png
  4. 3 projects is automatically generated by Visual Studio for Mac. Make sure XamInstall.iOS project is selected (project name is bold), then click Play button to RUN the app.Screen Shot 2017-06-29 at 10.30.33 PM.png
  5. Visual Studio will build the solution and deploy to iOS Simulator. If you can see this, it means that you have successfully setup Xamarin for iOS development.
    Screen Shot 2017-06-29 at 10.31.28 PM.png

Installation Test: Xamarin Android

  1. Right click on Android project (XamInstall.Droid), click on Set As Startup Project. Android project name will be bold now.Screen Shot 2017-06-29 at 10.31.44 PM.png
  2. Click Run button. It will takes some time for first time build.Screen Shot 2017-06-29 at 10.32.27 PM.png
  3. Visual Studio will build the solution and deploy to Android Emulator. If you can see this, it means that you have successfully setup Xamarin for Android development.Screen Shot 2017-06-29 at 10.34.31 PM.png

Additional

After the new project is created, you will notice that NuGet packages in solution is outdated. Android Support Library is only version 23.3.0. The latest available version is already 25.3.1. Please update the packages in all project before you continue to work on the solution.

Setup and Install Xamarin for Visual Studio 2017

  1. Download Visual Studio 2017 installer from visualstudio.com and RUN it.
    vs01.png
  2. You will need to Agree to the terms of Microsoft on the first start of Visual Studio 2017 installer.
    vs02.png
  3. Then wait for the initialization of the installer.
    vs03.png
  4. After initialization is completed, you should see the following screen. Under Mobile & Gaming category, select Mobile development with .NET component. Then click Install button to start the installation.
    vs04.png
  5. Visual Studio 2017 installer will start installation and it took about 30minutes to complete in my machine. (Very fast compare to Visual Studio 2015)
    vs05.png
  6. When the installation is completed, you will see the following screen. Just click on Launch button to start Visual Studio 2017.
    vs06.png
  7. Visual Studio 2017 is now installed with Xamarin and ready to rock.vs07.png
  8. Surprisingly the latest Visual Studio 2017 installer did not give any installation problem this time. Everything is installed correctly and the process is so smooth. Thumbs up for Microsoft and Xamarin team.
  9. If you need to setup Android Emulator, please refer to this POST.
  10. If you need to setup connection to Mac, please refer to this POST.

Setup and Install Xamarin for Visual Studio 2015: Xamarin Mac Agent

Setup Visual Studio Connection To Mac

In order to build and debug iOS project in Visual Studio, we need to configure Visual Studio to connect to a Mac machine in network or Mac in cloud.

  1. We need to setup the Mac first to allow the connection. Open Spotlight (Cmd-Space) and search for Remote Login and then select the Sharing result. This will open the System Preferences at the Sharing panel.
    mac03.png
  2. Tick the Remote Login option in the Service list on the left in order to allow Xamarin for Visual Studio to connect to the Mac. Make sure that Remote Login is set to allow access for All users, or that your Mac username or group is included in the list of allowed users in the list on the right. The Mac should now be discoverable by Visual Studio if it’s on the same network.
    mac04.png
  3. Back to Windows and open Visual Studio. Go to Tools>iOS>Xamarin Mac Agentmac01.png
  4. If the Mac is not setup correctly, you will see the following dialog. You can try to add the Mac manually by clicking the Add Mac button and put in IP address of the Mac. If it is not able to connect, you will need to check the setup in Mac. You can also try ssh to the Mac to test the connection between Visual Studio and Mac.
    mac02.png
  5. If there is a Mac setup correctly, you should able to see the Mac showing in the list. You can now select the Mac and click on Connect button.mac05.png
  6. If the connection is successful, you will see a dialog prompt ask for credentials. Please input the username and password that you have configure for Remote Login in the Mac.
    mac06.png
  7. If the credentials is correct, you should be now connected to the Mac.
    mac08.png
  8. Close the dialog and you should be able to Build and Run iOS project now.
  9. Note: Please make sure that both Windows and Mac is having same version of Xamarin in order for the connection to work.


You can find the other parts of the guide here:

Setup and Install Xamarin for Visual Studio 2015: Android Emulator

There is many options available for Android Emulator. I will list down a few:

Note: You can always debug using actual Android device instead of using Emulator for debugging.

If you need to turn ON Hyper-V in your machine, you will need to go with Visual Studio Android Emulator. To open/configure Visual Studio Android Emulator, go to Tools>Visual Studio Emulator for Android…

 1_VS2015_AndroidEmulator_05.png

You will be able to launch or configure the emulator in the new dialog popup. For details guide on Visual Studio Android Emulator please refer HERE.

1_VS2015_AndroidEmulator_06.png

This guide will be about how to work with Android SDK Emulator.

  1. To make Android SDK Emulator run without lagging, we will need to install Intel HAXM. However, Intel HAXM cannot work together with Hyper-V. So, we need to turn OFF Hyper-V in the machine. Open search windows and search for Turn Windows features on or off and open it.
    1_VS2015_AndroidEmulator_07.png
  2. Uncheck Hyper-V and restart PC. (If your PC do not have this Hyper-V features, it means that Hyper-V is not supported. So you can skip this step)
    1_VS2015_AndroidEmulator_01.png
  3. Make sure Virtualization Technology settings is Enable in BIOS settings.
    enable-vt-x-in-bios-2.jpg
  4. Download Intel HAXM installer HERE.
    1_VS2015_AndroidEmulator_02.png
  5. Remember to agree on the EULA to start the download.
    1_VS2015_AndroidEmulator_03.png
  6. After downloaded, extract the zip file. You should have the following files in the zip file. Open command prompt and RUN silent_install.bat. Intel HAXM installer should be running.1_VS2015_AndroidEmulator_04.png
  7. After Intel HAXM is installed, we can now proceed to setup the emulator. Open Visual Studio and go to Tools>Android>Android Emulator Manager
    1_VS2015_AndroidSDK_01 - Copy - Copy.png
  8. Android Virtual Device (AVD) Manager dialog should be popup. It might take some time to show if your machine is slow. Click on Device Definitions tab.
    1_VS2015_AVD_01.png
  9. Search for Nexus 5 device and click Create AVD button.
    1_VS2015_AVD_07.png
  10. Create AVD dialog will be show. In this dialog, you can configure the settings of the AVD. Set the settings as the following screenshots. Remember to Check setting Use Host GPU, without checking this the AVD will not able to run smoothly. After all settings is configure, click OK button.
    1_VS2015_AVD_03.png
  11. The AVD will now creating and will show a success dialog after it is completed. Click OK button on the success dialog to close it.
    1_VS2015_AVD_04.png
  12. The AVD is now successfully added. You can check it under Android Virtual Devices tab.1_VS2015_AVD_05.png
  13. After the AVD is configure, you will see the AVD is available in the device selection for deploy.
    1_VS2015_AVD_06.png
  14. If you need more information about how the AVD works and some detail explanations, please refer HERE.


You can find the other parts of the guide here:

Setup and Install Xamarin for Visual Studio 2015: Android SDK

Previously there is some errors when installing Android SDK during Visual Studio installation. We are going to fix that problem today. Before we start, let’s have some checking on what is not working.

Open Visual Studio 2015, Click on Tools>Android>Android SDK Manager. Nothing is happening.

1_VS2015_AndroidSDK_01.png

First thing to check is whether the Android SDK path is specify in Options. So, let’s go to Tools>Options>Xamarin>Android Settings. You will notice that there is showing “No Android SDK found”1_VS2015_AndroidSDK_08.png

Now let’s start with the steps to fix the Android SDK.

  1. Open File Explorer and go to C:\Program Files (x86)\Android\android-sdk (default installation path of Visual Studio installer). In my case, the Android SDK is actually installed in the path but it is not setup correctly in Visual Studio. If you cannot find the Android SDK in the path, you can download it from GitHub and get android-sdk-initial folder.1_VS2015_AndroidSDK_11.png
  2. Let’s try to add the path into Options. Open Visual Studio and go to Tools>Options>Xamarin>Android Settings. Then click on Change button.1_VS2015_AndroidSDK_08 - Copy.png
  3. Specify the Android SDK path as C:\Program Files (x86)\Android\android-sdk and click OK button.
    1_VS2015_AndroidSDK_09.png
  4. However, there is some error is pop up saying “Cannot find adb.exe in specified path: …”.  This is because the Android SDK Manager that ship with Visual Studio 2015 is outdated. We will need to update it first before we continue.
    1_VS2015_AndroidSDK_10.png
  5. Go back to File Explorer with the Android SDK Manager. Double click on SDK Manager to RUN it.1_VS2015_AndroidSDK_11.png
  6. You should be seeing Android SDK Manager dialog. It might take some time if your machine is slow.
    1_VS2015_AndroidSDK_12.png
  7. Uncheck everything. Then check only the following:
    – Android SDK Tools
    – Android SDK Platform-tools
    – Android SDK Build-tools (I don’t think this is necessary, but I just install it :D)
  8. Click Install 2 packages and accept the terms to proceed the installation.
    1_VS2015_AndroidSDK_14.png
  9. However, if you are using Windows 10 like I am, you should be having error to install the packages. The error is reporting “Failed to create directory C:\Program Files (x86)\Android\android-sdk\temp”.  This is because you will need to have Administrator rights to work in Program files folder.
    1_VS2015_AndroidSDK_15.png
  10. What I normally do is put the Android SDK to other location. In this guide, I put the Android SDK folder in C:\Users\[username]\AppData\Local\Android\android-sdk
  11. After moved the folder, RUN the SDK Manager and install the packages. You should be able to install the packages normally and seeing the following status. If you having problem to update the SDK Manager, you can download it from GitHub and get android-sdk-updated folder.
    1_VS2015_AndroidSDK_17.png
  12. After complete update the packages, you will need to RESTART the Android SDK Manager. Just close the SDK dialog and reopen it by double clicking the SDK Manager. You will notice that the folder structure of the SDK folder is already updated too.
    1_VS2015_AndroidSDK_19.png
  13. After reopen the SDK Manager, you will see more packages is listed.
  14. Proceed to update and install the remaining packages that we need. Recommended packages to install can be refer to HERE
    1_VS2015_AndroidSDK_18.png
  15. After all packages is installed, we may proceed to set the path in Visual Studio. Open Visual Studio, go to Tools>Options>Xamarin>Android Settings. Then click on Change button.
  16. Specify the Android SDK path as C:\Users\[username]\AppData\Local\Android\android-sdk and click OK button.
    1_VS2015_AndroidSDK_20.png
  17. You should be able to set the Path successfully and seeing a green check mark for Android SDK Location.
    1_VS2015_AndroidSDK_21.png
  18. Finally, after so many steps, you are now setup Visual Studio with Android SDK successfully.


You can find the other parts of the guide here:

Setup and Install Xamarin for Visual Studio 2015: JDK Setup

Java Development Kit (JDK) Setup

  1. Open command prompt and type in java -version.
    If it is showing ‘java’ is not recognized as an internal or external command, operable program or batch file, it means that we need to install JDK in the machine.
    Important: If your java version is less than 1.8, you will also need to update the JDK because the latest Android version needs java 1.8 and above to compile.
    1_VS2015_AndroidSDK_00.png
  2. Download Java SE Development Kit 8 from Oracle site and follow the installation instructions. You might need to restart your machine after the installation of JDK.
    1_VS2015_AndroidSDK_04.png1_VS2015_AndroidSDK_05.png1_VS2015_AndroidSDK_06.png
  3. Open Visual Studio and click on Tools>Options
    1_VS2015_AndroidSDK_02.png
  4. Options dialog should be prompt up. Navigate to menu Xamarin>Android Settings. Then click Change button beside Java Development Kit Location.1_VS2015_AndroidSDK_03.png
  5. Select JDK dialog should be prompt up. Select the path that JDK is installed and click OK button.
    1_VS2015_AndroidSDK_07.png
  6. Java Development Kit Location section should be showing with green check mark.1_VS2015_AndroidSDK_08.png


You can find the other parts of the guide here:

Setup and Install Xamarin for Visual Studio 2015

Recently when I conducting training/workshop, there is quite a numbers of peoples is having problems with Xamarin installation. My machine is setup with Xamarin long time ago and I only deal with updates all the time. So, I am wondering is there really so much problem with Xamarin installation. I decided to give it a try to check it out.

Visual Studio Installation with Xamarin

  1. Download Visual Studio 2015 installer and RUN. You will not able to download VS2015 community now from visualstudio.com (Only VS2017 is available now). I downloaded mine from MSDN subscriber download section. The details of the installer I use for this guide:

    Visual Studio Community 2015 with Update 3 (x86 and x64) – Web Installer (English)
    Released: 6/27/2016
    en_visual_studio_community_2015_with_update_3_x86_x64_web_installer_8922963.exe

  2. After the installer is appear and complete some of the initialization steps, you should see a page with as image below. Please select Custom as the type of installation. After that, click on Next button.
    1_VS2015_Install_01.png
  3. You should see a page with list of features to select. Please expand Cross Platform Mobile Development and SELECT C#/.NET (Xamarin v4.2.1). After you select it, a few other features will be auto selected too. After that, click on Next button.
    1_VS2015_Install_02.png
  4. The next page will be a pages to confirm your selected features. Just click on Install button.
    1_VS2015_Install_03.png
  5. Please wait for the installation to finish. Make sure you are connected to the internet because the installer will download the components for installation.
  6. After the installation completed, you should be seeing the following screen. I’m having 2 warnings regarding Android SDK Setup. I will explain in next guide on how to fix the Android SDK.
    1_VS2015_Install_04.png
  7. After installed, open Visual Studio and go to Tools>Options. Then select Xamarin>Other in left pane. Click on Check Now button to check for updates.1_VS2015_Update_01.png
  8. Xamarin for Visual Studio Updates dialog is show. Download updates available and install it.
    1_VS2015_Update_02.png


You can find the other parts of the guide here: